
Optimising images without losing quality
A lot of our clients are photographers, and of course that means that their websites tend to be image heavy. A digital photo is much larger in file size than some artwork provided by a graphic designer, simply because a photo typically contains a lot more colours, and complex structures, which push up the file size.
So how do we ensure that our page loads quickly, while those images still look amazing? It’s not as difficult as it might sound!
Step 1 – exporting the right size to begin with
Pixel Dimensions: The optimal size for your images to be used on your website is 2000px wide. Most displays are no more than 1920px wide, which leaves a little headroom. Most of your images aren’t going to be displayed the full width of the screen anyway, so this gives a good balance of file size and quality.
Quality: Pull that quality slider down! There’s no need for it to be at 100%. A quality of 70% – 75% is sufficient for web, I promise you that at normal viewing size you won’t be able to tell the difference between them, but it dramatically reduces the file size.
PPI: Contrary to popular belief, when working in pixels, this setting does *absolutely nothing*. The internet is not, and has never been, 72ppi. Just some monitors were typically that, and you used to have to size things on websites by pixel widths, so that’s where that came in. But you can safely just ignore it. (Don’t believe me, export an image twice and only change the PPI, the file size won’t change).
Now there is an argument that you should size images based on their usage. So if you want an image that’s only going to be half-width of the screen you can make it smaller. And yes, this is absolutely true, but as with anything it’s a balancing act. If you want to perfectly optimise your site, then look at how many pixels wide each image will display on a screen, and resize it to that when you’re exporting.
But we don’t need perfect, and we need to balance effort with gain. That would be a lot of effort, for very little gain!
Step 2 – Further Compression
JPEG files are an old format, and they have a lot of code in them that modern browsers don’t need. This can be stripped out to reduce file size further, with no loss of quality.
There are a couple of ways to do this, if you’re not on WordPress then I would recommend something like JpegMini which you can run your images through before uploading. – https://www.jpegmini.com/
But if you are on WordPress, I highly recommend using ShortPixel Image Optimizer. It has a “glossy mode” that reduces image size further, with no impact to quality, can resize images on upload if you forgot to make them 2000px wide to begin with (although you get better results if you follow Step 1 first), and it optimizes your images when you upload them.
The free plan gives you 100 credits per month to optimise images, which is probably enough unless you’re adding a *lot* of content.
Before you start, head over to here: https://shortpixel.com/otp/af/EBKRAYY768663 (affiliate link) and set up an account, just a free one for now. You might not need anything else.
Then add the plugin. This is the plugin you want, ignore their other ones:

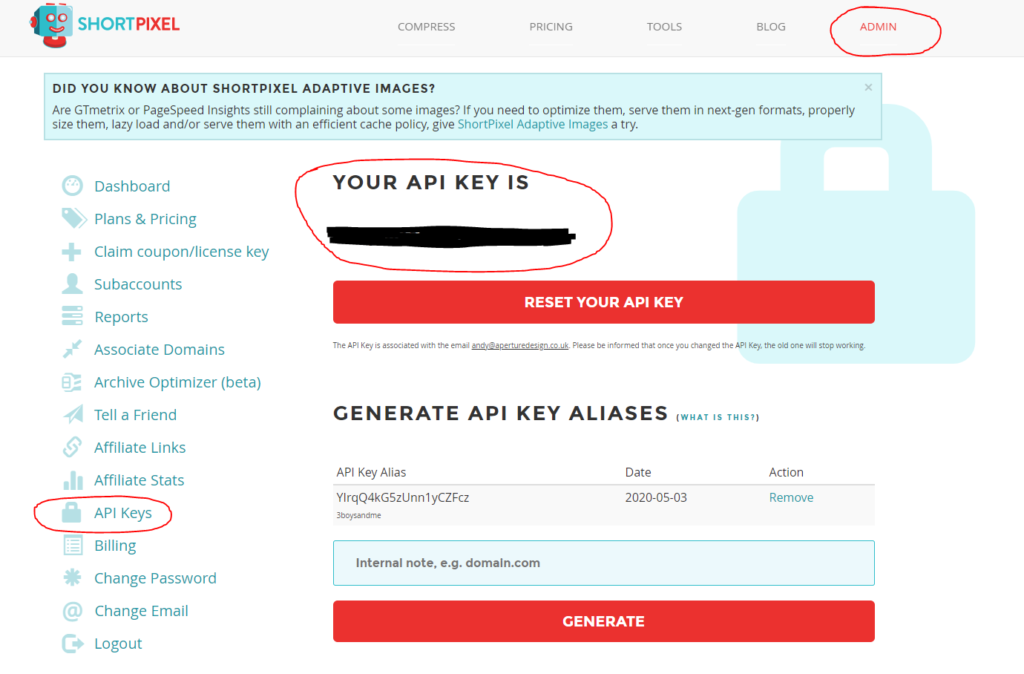
When you activate it, it will ask you to add in your API Key, this is on your new ShortPixel account, on the left hand menu:
Copy and paste this in and you get the options screen, this is how you want it:
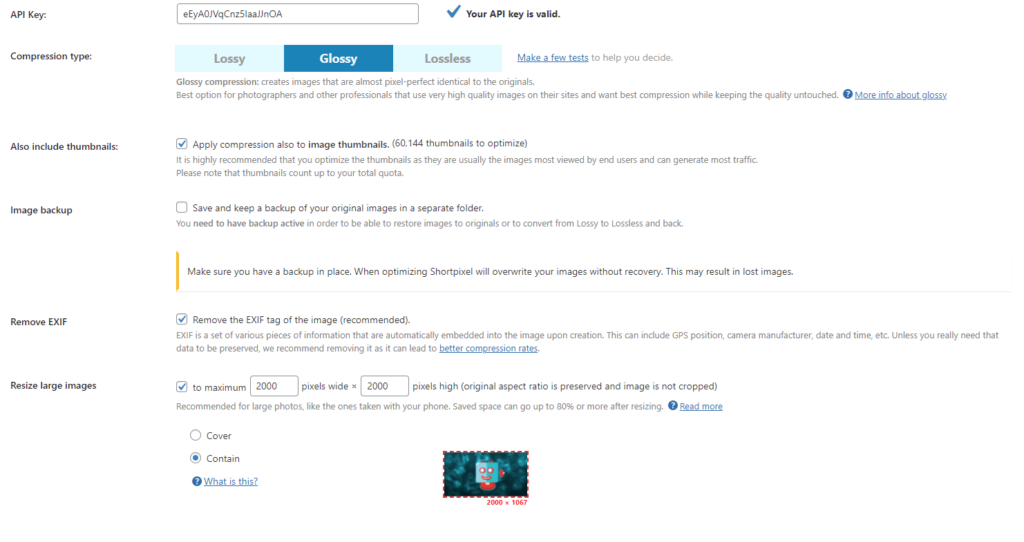
You want:
Glossy Mode
Include Thumbnails
Remove EXIF
Resize Images – 2000px x 2000px – Contain
And untick Image Backup, otherwise every time you upload an image it will keep your optimised version *and* the un-optimised, taking up valuable hosting space.
Once you’ve saved this, any images you upload will be automatically optimised.
Step 3 – Using ShortPixel to resize existing images
As you can see from this screenshot, I’ve installed this on an existing, very large website with thousands of images that haven’t been optimised. I know this is going to impact the site speed, so I want to take care of that. Thankfully ShortPixel has a way to sort this out for me!
First we’re going to change a setting on ShortPixel, we’re going to go to Settings – ShortPixel on WordPress, and we’re going to turn the backup back on:

This is because I’m going to be resizing a lot of images at once, and if something goes wrong, I’ll need to be able to fix it. The rest of the settings remain the same.
Then at the bottom of the screen, you’re going to click “Save and go to Bulk Process”.
If you have lots of images, then you’re going to see a box like this:

If you click on that, and then the “most economical” tab, it will give you the options for how much you might need to upgrade your account by to cover your whole site. For this site, it’s going to cost me $29.99 as a one off fee.
But being that the alternative, is to go through the site, find out which are too big, and then manually replace that image file with an optimised one, paying the small fee for this to be automated is more than worth it to me.
So I add the credits, then click Start Optmizing:

Now this is going to take some time, and on some webhosts, you may have to restart the process several times if they do not give enough resources to your website! Even with fast hosting, a site of this size could take 5 or 6 hours to optimise all the images, be patient.
Step 4 – Ensure your hosting is fast!
Even with optimised images, your hosting still has a very large part to play. You can have a fast website with overly large images if your hosting is fast enough! Think your host isn’t up to scratch? Why not see what we can do for you!
With properly optimised images and fast hosting it is entirely possible to have a fast website, even when using a page builder – don’t let people tell you different.

oh my! this is brilliant and saved me hours! thank you Andy